 |
Garden journal entry |
 |
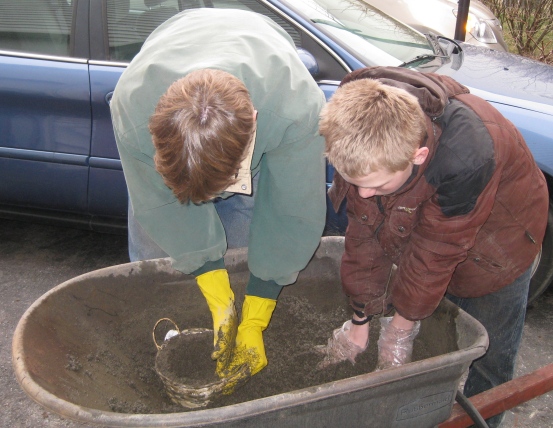
| March 24, 2013. This weekend marked a few firsts for our family. The biggest news was our acquisition of two ducklings. Amy slyly got me to go on an errand with her, and suggested we stop by the local Tractor Supply Co outlet. Next thing I knew, we were leaving with two cheeping mallardlings, along with bags of supplies. The little ones are now living quite comfortably in our living room, cozy in a rabbit cage lined with pine shavings (which they get wet in an amazingly short amount of time). Provided they survive Lily's nearly non-stop attentions and make it out into the garden and our big pond, I'm sure they'll be photo-featured in an upcoming journal entry. But today's photo pertains to another first, more directly related to the upcoming gardening season: hypertufa! Amy and I have been curious about trying to make our own pots and troughs from the porous artificial rock material for years, but had never quite gotten around to it. This year, thinking about all the little rock garden plants I grow from seed that get lost in the big bad nursery area and perish within their first year, I was determined to provide better survival opportunities for some of those babies. Hypertufa containers seemed just the ticket – so yesterday I ventured out to get big bags of Portland cement, perlite, and milled peat moss, so that today I'd be ready to give it a go. I had plenty of help: Ben (in the photo here) and Lily helped to sift the big chunks out of the peat moss, and then to mix the cement, perlite, and peat moss in a roughly 2:3:3 ratio. Then Ben was in control of the water nozzle, spraying a little bit at a time until the mixture had the right consistency (it may have been a little too dry, in the end; hopefully that won't affect the results too much). When the building material was all ready, Amy joined the crew. We had already gone out to the dollar store to stock up on a range of containers to use as molds – the one in the photo here is a simple basket, which will have to be destroyed to remove it from the container we built inside it. Most of the others are plastic ones that we can hopefully reuse. Since this is our first go at this, we don't know if it will all work out – by a few days from now, when we attempt to remove the containers from the molds, we'll get our first indication whether we're likely to meet success. But then we'll still need to wait another several weeks for the whole thing to cure. So stay tuned – if all goes well, there will be photos of brand new troughs planted with darling little plants by summer! |
Last modified:
September 09, 2009
Contact me
|